Between dealing with the everyday anxieties of the COVID-19 pandemic and witnessing the tragic effects of systemic racism and police brutality, it's safe to say that many of us are feeling an immense amount of stress and are looking for ways to relieve it.
These issues can't be solved overnight, but you can do something right now to help you feel better. Practicing yoga is a great way to relieve stress, and while many gyms and fitness studios across the country are still closed, you can cultivate your own yoga practice at home.
Video of the Day
Video of the Day
The other great perk of yoga is building upper-body muscle strength, so if you're bored with your body-weight workouts and are looking for another way to sculpt stronger arms and shoulders, consider adding some flows into your routine.
How Yoga Strengthens the Upper Body
While lifting weights is what's going to ultimately help you grow bigger and stronger arms and shoulders, doing yoga can help support those goals. From Chaturanga, which is essentially a push-up because you move from a high plank to a low plank, to Upward Facing Dog and Crow pose, there are countless yoga poses that work your upper body.
In fact, a December 2011 study published in the Asian Journal of Sports Medicine suggests that performing Sun Salutations, which is a yoga sequence that involves moving from a standing position to plank, can help strengthen the shoulders and arms, as well as the core, legs, chest and back.
In the study, 79 participants performed 24 cycles of Sun Salutations six days a week for 24 weeks and saw improvements in overall strength.
Check out more of our 20-minute workouts here — we've got something for everyone.
Try This 20-Minute Yoga Flow for Stronger Arms and Shoulders
This 20-minute yoga flow will help you strengthen and sculpt your upper body, and bring a sense of calm to your body and mind. As you move through this flow, remember to allow your breath to lead you while mindfully transitioning between each pose. Aim to hold each pose for 5 to 10 breaths and complete 4 to 5 rounds of the entire sequence.
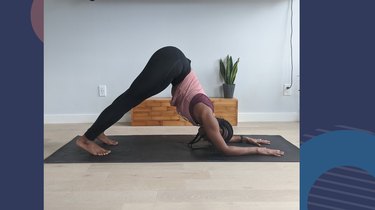
Move 1: Downward Facing Dog (Adho Mukha Svanasana)

- On a mat, get on your hands and knees, and set your knees directly below your hips and your hands slightly in front of your shoulders. Spread your palms and keep your index fingers parallel or slightly turned out. Tuck your toes under.
- Exhale and lift your knees away from the floor as you push your hips up toward the ceiling and press your shoulders away from your ears.
- As you exhale, push your thighs back and press your heels down on the floor.
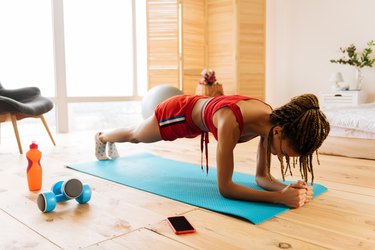
Move 2: High Plank

- From Downward Facing Dog, shift your weight forward until your shoulders are stacked directly above your wrists. Keep your arms straight.
- Press your hands firmly into the mat and set your gaze on the floor between your hands.
- Try to resist sinking your tailbone into the floor by drawing the shoulders down your back and pushing them away from your ears.
- Come up onto the balls of your feet.
Tip
You are in proper alignment when you shift back and forth between plank and Downward Facing Dog, so you don't have to move your arms or legs. Feel free to come down to your knees as a modification.
Move 3: Low Plank (Chaturanga Dandasana)
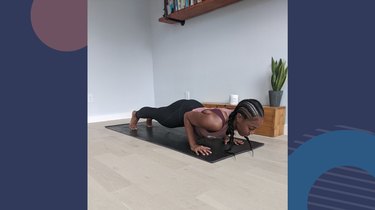
- From a high plank, slowly lower your body down halfway, so you're hovering a few inches above the floor.
- Press your hands down into your mat, keep the elbows planted firmly by your sides and set your gaze slightly forward.
- On an exhale, transition into the next pose (or come down all the way on your mat for a quick breather when necessary).
Move 4: Upward Facing Dog (Urdhva Mukha Svanasana)

- From a low plank, flip onto the tops of your feet.
- Push your arms straight up, stacking your shoulders over your wrists and keeping your elbow creases facing towards the front of your mat.
- Hover your thighs a few inches above your mat.
- On your next exhale, curl your toes under and transition back into your high plank.
Move 5: Side Plank (Vasisthasana)

- From a high plank, shift your weight onto the outside edge of your left foot and stack your right foot on top of the left.
- Place your right hand on your top hip or raise the hand up toward the ceiling.
- Turn your torso to the right, press your left hand firmly into the floor and set your gaze at your right fingertips.
- Align your entire body so you form one long diagonal line from your heels to your crown.
- After staying here for 5 to 10 breaths, transition back into your high plank and repeat on the other side before making your way back to Downward Facing Dog.
Tip
Modify this pose by placing your left knee on the mat, with the left foot coming directly out behind the body and facing the right edge of your foot.
Move 6: Dolphin Pose
- From a high plank, come onto the floor on your hands and knees.
- Set your knees directly below your hips and your forearms on the floor.
- Press your forearms firmly into the floor as you push your sit bones up towards the ceiling.
- Draw your shoulder blades down your back toward your tailbone.
- Hover your head a few inches off the ground in between your arms.
Tip
For an extra challenge, you can get into Dolphin pose from Downward Facing Dog by keeping your tailbone lifted as you lower your forearms to the mat.
Move 7: Dolphin Plank
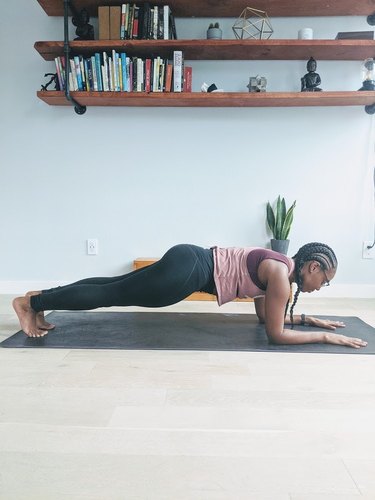
- From Dolphin pose, bend your knees and walk your feet back until your shoulders are directly over your elbows, and your hips are parallel to the floor.
- Stack your shoulders over your elbows, pressing your inner forearms and elbows firmly against the floor.
- Draw your shoulder blades down your back toward your tailbone.
- Set your gaze between your hands.
Tip
To intensify this sequence, slowly transition between Dolphin pose and Dolphin plank pose 3 to 5 times each round before moving onto the next pose in this sequence.
Move 8: Handstand Variation (Adho Mukha Vrksasana)
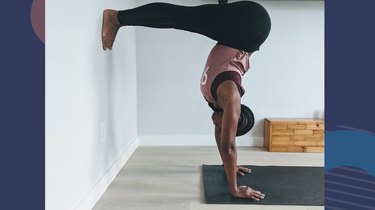
- Find a blank spot on a wall, free of any pictures, frames, mirrors or anything that can potentially cause harm.
- With your back facing the wall, fold forward and walk your hands out away from the wall coming into Downward Facing Dog.
- With your feet at the base of the wall, slowly walk your feet up the wall as you slowly walk your hands back toward the wall.
- Stack your shoulders over your wrists.
- Set your gaze on the wall.
Tip
This pose can be pretty intense, so feel free to come out of the pose and back in as necessary.
Move 9: Child's Pose
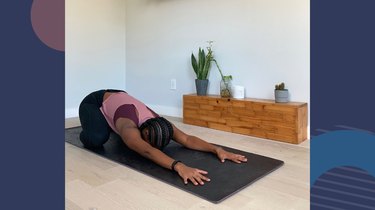
- On your mat, come down onto your hands and knees.
- Center your breath and turn your awareness inward.
- Spread your knees wide while bringing your big toes to touch.
- Sink your sit bones down toward your heels.
- Extend your arms in front of you while allowing your forehead to rest on your mat.
- Stay in this pose for at least 3 to 5 minutes.
Tip
Feel free to keep your knees and thighs more narrow if that's more comfortable.
Was this article helpful?
150 Characters Max
0/150
Thank you for sharing!
Thank you for your feedback!