Replacing the chain on your Schwinn bicycle can seem like a daunting task, but with the correct tool, the job is not too difficult. Chains for all bikes have the same core design, small links that join with pins. The old chain is one circular piece that must be disconnected. A chain tool is necessary to push a pin out between the links so the old chain breaks. Once the chain is off, a new one is fed through the derailer and connected together to become one circular piece that will get your Schwinn up and running again.
Step 1
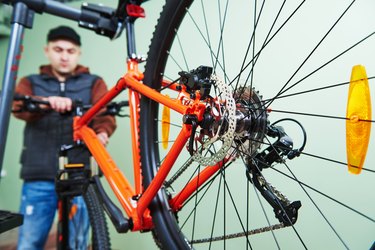
Set the chain into the vise area of the chain tool. Work in an area forward of the derailer or toward the pedals. The derailer is the two gears that hang off the gear assembly and move the chain. The chain must sit inside the vice at the intersection of two links where the pin connects them.
Video of the Day
Step 2
Align the pin with the slot or pushing mechanism on the tool. Turn the tool so the head extends toward the pin to push it out. As the chain disconnects, look at the derailer. The lack of pressure from the chain will swing the derailer back and you can see how the old chain feeds through it. Remove the chain from the bike.
Step 3
Count the number of links in the old chain. You need to know how many links your new chain needs to fit the bike. If the old chain has 20 links, the new chain must have 20 links.
Step 4
Size the new chain. If the new chain has 22 links, you need to remove two. Use the chain tool to push out the pins for two links.
Step 5
Slide one end of the chain into the bottom gear on the derailer. Derailers have an S-curve design. Pull the chain under the lowest gear and feed it from the bottom. For example, if the derailer's top gear is facing the right, pull the chain under the bottom gear moving left. Thread it over the bottom gear and pull it to the right. Fit the teeth of the gears between links.
Step 6
Pull the chain under the top gear. In the above example, your chain end is now moving under the top gear. Feed it under the top gear and over toward the gear assembly on the bike. Once the chain clears the top gear, it is now moving left again onto the smallest gear on the gear assembly that sits in the center of the tire.
Step 7
Move the chain over the top of the smallest gear on the gear assembly toward the pedals to the right. Wrap it around the pedals but do not insert the teeth from the pedal gear into the chain. Pull the chain around the pedals and under to the other side. The chain is now moving to the left toward the free end. If the chain is correctly sized, you still have several inches of chain hanging from the derailer.
Step 8
Join the two ends of chain together. The method will depend on the type chain you purchased. Some chains provide a special pin for chain connection. This pin will be longer. Put the two ends of the chain and press the pin into place. The chain will come with instructions on proper joining.
Step 9
Feed the chain over the pedal gear. Insert the teeth of the gear into the space between the links. Work on the top of the gear, then turn the pedals to force the chain to feed onto the rest of the gear.
Video of the Day