
Chicken Kiev is a decadent but relatively simple dish — especially if you put it together the night before or buy it pre-made and ready-to-cook from the grocery store.
The dish consists of breaded, deboned chicken breast stuffed with herb-seasoned butter and is typically cooked using moderate-heat pan frying. While cooking, it's important to handle the delicate breading carefully and refrain puncturing the chicken — you want the delicious crust and buttery stuffing in your mouth, not left in your frying pan.
Video of the Day
Video of the Day
Things You'll Need
Neutral-tasting frying oil such as canola or vegetable oil
Straight-sided frying pan or skillet
Deep-fry thermometer
Tongs
Meat thermometer
Wire rack and baking sheet (preferred) or paper towel-lined platter
Step 1: Store Chicken Properly

Ensure that the pre-made chicken Kiev has been in the refrigerator for at least 2 hours before cooking. Refrigerating will help solidify the butter in the center and reduce the chance of, or the amount of, flavorful butter leaking out during cooking.
Step 2: Heat Up the Oil

Pour 1/2 inch of cooking oil into a large, straight-sided frying pan or skillet. Set the heat to medium-low and heat the oil to about 325 degrees Fahrenheit when tested with a deep-fry thermometer. Check frequently and adjust the heat as necessary to maintain that temperature during cooking.
Tip
Pre-made chicken Kiev can also be cooked in your oven, however, the exterior of the chicken will not be as crisp as the pan-fried version.
To bake chicken Kiev in the oven, preheat to 350 degree Fahrenheit and bake on a wire rack set on a baking sheet for 40 to 45 minutes until the chicken reaches 160 degrees Fahrenheit. Remove the chicken from the oven and allow to rest for 5 minutes before serving.
Step 3: Cook the Chicken Kiev
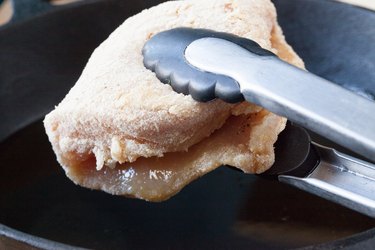
The best way to add chicken to a hot oiled pan is to hold the thicker end of the chicken with tongs and insert the chicken slowly, starting with the thinner end first. This will reduce the chances of splattering or splashing hot oil.
Cook the chicken for 10 to 13 minutes, flip it over and continue to cook for an additional 10 to 13 minutes until it reaches an internal temperature of 160 degrees Fahrenheit. To check the internal temperature of the chicken Kiev, insert the meat thermometer into the chicken only — don't pierce the center.
Remove the chicken from the pan onto a wire rack set over a sheet pan or a platter lined with paper towels and serve after 5 minutes.
Tip
- Piercing all the way through the chicken — with tools such as meat thermometers and forks — can cause the butter and seasonings to leak from the chicken. Always use tongs to flip the chicken and be careful when inserting a meat thermometer into the chicken.
- To minimize the risk of rupturing the chicken or inadvertently removing the breading, flip the chicken only once.
- Paper towels have the tendency to stick to breading and possibly tear it from the meat, so a wire rack is strongly preferred.
Warning
The USDA recommends a safe internal cooking temperature for chicken of 160 degrees Fahrenheit. However, longer cooking times and higher heat will increase the chance of the chicken Kiev rupturing. The choice is ultimately up to you.
Was this article helpful?
150 Characters Max
0/150
Thank you for sharing!
Thank you for your feedback!