Strengthening your rotator cuffs — the four muscles (and countess tissues) that surround the shoulder blades and help to stabilize them — is essential for maintaining overall shoulder health. But doing certain exercises might actually be doing more harm than good, especially if you lack adequate shoulder mobility and strength. (Which, let's face it, most of us are a little restricted.)
This can lead to tearing or fraying of the rotator cuff muscles and restrict the range of motion in your arms. In other cases, it can result in serious injury, including shoulder impingement and bursitis, according to the American Academy of Orthopaedic Surgeons.
Video of the Day
That said, here are five worst exercises for your rotator cuff and five swaps to keep your shoulders safe and healthy.
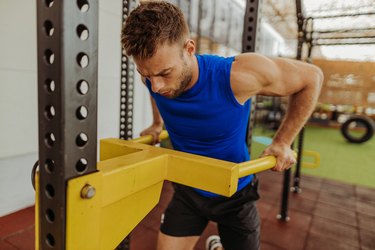
1. Triceps Dip
Triceps dips can be problematic because of the pressure they place on your shoulder joint. While dips strengthen your triceps and shoulders, they can injure your rotator cuff if you lack shoulder extension mobility, says Grayson Wickham PT, DPT, CSCS, founder of Movement Vault .
"When your shoulder extension mobility is lacking, meaning you have tight shoulders with extension, your shoulder joint will compensate," he explains. "This compensation takes the form of your shoulders having to round excessively forward, which puts extra strain on your ligaments and labrum in the front of your shoulder. Over time, this can lead to ligament, tendon and labrum injuries and pain."
Do This Instead: Skull Crusher
Skull crushers, aka lying triceps extension, isolate your triceps without putting stress on your shoulder ligaments or rotator cuff tendons.
Skull Crusher
- Lie on your back and hold a barbell at shoulder-width with a supinated grip (hands underneath the bar).
- Press your low back into the bench to help keep your core muscles engaged.
- While keeping your upper arms and elbows perfectly still, bring the barbell toward your upper forehead while only bending your elbows.
- Then, bring the barbell back to the starting position by straightening your elbows.
- Keep your elbows close to your body the entire time, not allowing them to flare outward.
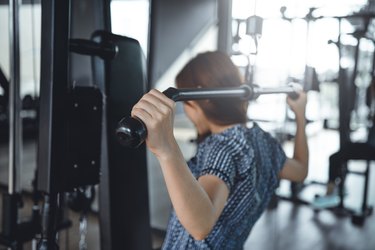
2. Behind-the-Neck Lat Pulldown
The lat pulldown strengthens your latissimus dorsi — the large muscles that run down the sides of your back. But pulling the bar behind your neck places your shoulder in an externally rotated and abducted position, which places stress on the weakest part of your joint capsule.
This can result in joint laxity (hypermobility), which can be detrimental especially to throwing athletes who need to have a stable shoulder joint. In addition, it places your neck in a forward position, which strains your cervical spine.
"Having limited shoulder mobility and performing this exercise can lead to poor form and cause compensation in your shoulders, which can lead to shoulder joint wear-and-tear, pain and injury," Wickham says.
Do This Instead: Front Lat Pulldown
A front lat pulldown is a safer position for your shoulder joint and protects your cervical spine while strengthening your lats.
Front Lat Pulldown
- Sit securely in a lat pulldown machine with your knees under the pad if there is one and your feet firmly pressing into the ground.
- Engage your core by pulling your rib cage downward.
- Grip the pulldown bar slightly wider than shoulder-width apart.
- Pull the bar down toward your upper chest as far as possible.
- Focus on moving your elbows down and backward while keeping them relatively close to your ribs during the pulldown.
- Slowly move your arms back overhead to the starting position.
3. Upright Shoulder Row
An upright shoulder row causes your shoulders to internally rotate as you pull a weight up toward them. This motion can put you at risk for shoulder impingement, causing the acromion (the bone on top of your shoulder) to rub against your rotator cuff tendons.
In addition, Wickham says that many people compensate while doing this exercise by rounding the shoulders forward. "Over time, this can lead to wear and tear on your shoulder ligaments and labrum, typically leading to a repetitive shoulder injury and pain down the line."
Do This Instead: Seated Dumbbell Shoulder Press
The seated dumbbell shoulder press is a much safer and better way to work your shoulders, as well as your chest muscles, without risking impingement.
Seated Dumbbell Shoulder Press
- Sit tall on a bench or chair with your feet firmly planted on the ground.
- Engage your core by pulling your rib cage downward. Try not to let your rib cage flare upward.
- Hold the dumbbells by the sides of your shoulders, forming goal posts with your arms. Your elbows should be directly underneath the dumbbells.
- While keeping your thumbs facing inward, press both dumbbells up overhead as high as possible.
- Slowly return your arms back to the starting position.
4. Behind-the-Neck Shoulder Press
"The only difference with the behind-the-neck shoulder press versus the behind-the-neck lat pulldown is that you push the weight versus pull it," Wickham explains. This type of exercise works your deltoids, along with your traps (upper back muscles), triceps and serratus anterior (fan-shaped muscles that attach to your ribs and front of shoulder blades).
The behind-the-neck shoulder press makes our list of the best exercises for rotator cuff health because it puts your shoulder in the same vulnerable position as the behind-the-neck lat pulldown and can injure your tissues.
"Behind-the-neck shoulder presses require very good shoulder mobility, similar to the behind-the-neck lat pulldown," Wickham says. "If you don't have adequate mobility, you can be setting yourself up for a potential repetitive wear-and-tear injury."
Do This Instead: Standing Military Press
The standing military press allows you to strengthen your shoulder muscles without putting undue stress on the joint and rotator cuff. With this exercise, you press the bar up and lower it in front of your head, instead of behind your head.
Standing Military Press
- Stand with your feet about shoulder-width apart and hold a barbell with your hands shoulder-width apart directly in front of your shoulders.
- Engage your core engaged by pulling your rib cage downward. Try not to let your rib cage flare out too much during this exercise.
- Press the barbell directly overhead as high as possible, finishing with your biceps by your ears.
- Slowly return the barbell to the starting position in front of your shoulders.
- Keep your elbows relatively inward the entire time and avoid letting them flare outward.
5. Battle Ropes
Working your arms and shoulders, battle ropes are a great way to combine cardio and strength training. Unfortunately, they can also set you up for a potential rotator cuff injury if you don't have adequate shoulder stability.
"Battle rope exercises specifically require shoulder blade stability," Wickham explains. "When performing battle rope exercises, you are typically moving your arms very fast in an explosive manner. But if you lack shoulder blade stability, your shoulder joint can potentially wind up in a suboptimal position while performing the explosive arm movements. Over time this can cause repetitive pain and injury to your shoulder joints."
Do This Instead: Farmer's Walk
The farmer's walk is a total-body exercise that gets your heart rate up, but it doesn't include the explosive arm movements that can potentially cause shoulder injury. This simple exercise involves walking with a heavy set of weights for a specified amount of time or distance. It targets your lower body, core, shoulders — including your rotator cuff muscles and deltoids — biceps, triceps, forearms and grip.
Farmer's Walk
- Stand tall with your chest up, holding a dumbbell or kettlebell in each hand by your side.
- Pinch and depress your shoulder blades slightly back and down. This helps you maintain stable shoulders and will limit the amount that your shoulders round forward.
- Walk forward as far as possible until your grip fatigues and you can no longer maintain proper form. Keep the weights by your sides the entire time and avoid leaning to one side.
- Aim to walk 25 to 30 seconds and then progress.
Tip
According to the American Council on Exercise, when doing the farmer's walk, you should aim to carry your body weight between the two dumbbells. So if you weigh 160 pounds, you should hold an 80-pound load in each hand.
Was this article helpful?
150 Characters Max
0/150
Thank you for sharing!
Thank you for your feedback!